What are the Stages of Grouting?
Grouting is a fundamental stage in several construction and renovation projects, particularly when it comes to installing tiles, stones, or masonry. Grout serves to fill the gaps between materials, providing stability, support, and protection. The grouting process involves several stages, each contributing to the overall quality and durability of the finished installation. Let’s delve into the stages of grouting in detail:
Preparation
Preparing the surface means that the tiles or stones are properly set in place, with appropriate spacing between them. The surface should be clean, dry, and free from debris, dust, or any contaminants that could interfere with the grouting process.
Selecting Grout
Choosing the right type of grout is crucial. Grout comes in various formulations, including cement-based, epoxy, and urethane. The choice of grout depends on factors, such as type of tiles, the location of the installation (interior or exterior), and the level of moisture or foot traffic.
Read More
Leakage Solution for Expansion Joint Treatment in Pakistan
Top Ways to Fix Bathroom Leakages
What Causes the Bathroom to Leak?
Mixing Grout
Once the grout type is selected, it needs to be mixed according to the manufacturer’s instructions. The grout mixture should have a consistent texture and proper viscosity to ensure proper application.
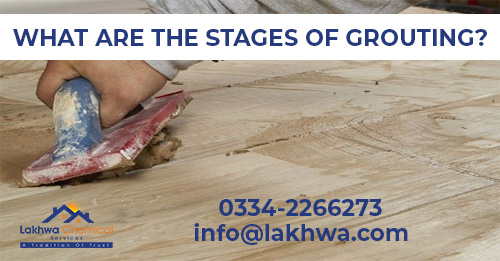
Application
Grout is spread over the surface using a rubber or grout float, which helps press the adhesive into the gaps between tiles or stones. The float is held at a slight angle to ensure proper coverage and smoothness. The grout is worked into gaps; excess grout is wiped off the tile surfaces.
Packaging Joints
After the initial application, the grout is pressed further into the gaps by using a tool called a grout packer. This step helps ensure that the grout fills the joints and eliminates any voids or air pockets.
Cleaning Excess Grout
Once the grout has been packed into the joints, it’s time to clean off the excess grout from the tile surfaces. This is done after the grout has been set for a short period but before it fully cures. A damp sponge is used to gently wipe off the excess grout while avoiding any disturbance.
Finishing Touches
After the initial cleaning, a final wipe-down is done to ensure that the tile surfaces are free from grout haze or residue. This step enhances the appearance of the tiles and provides a limpid view of the grout lines.
Curing and Sealing
Grout needs time to cure and harden. Once the grout is fully cured, it’s advisable to apply a sealer to protect the grout lines from moisture, stains, and dirt. Sealers help extend the lifespan of the grout and maintain its appearance.
Final Inspection
After the grout is cured and sealed, a final inspection is conducted to ensure that the grouting has been applied to the desired standards. Uniformity is checked in grout lines to ensure that the joints are properly filled with no visible defects.
Read More
How to Fix Leaking Water Tanks?
RCC Roof Waterproofing: Process Used for Concrete Flooring
What is Grouting? What are its Types?
How to Grout Tiles in Eight Steps?
-
Preparation
Prepare the joints by leveling excess adhesives. Remove big particles and vacuum for a spick and span area.
-
Mix
Pour the grout in a mixing bucket. Once the water is absorbed, the evenness of the solution will showcase itself. After mixing, leave it for 5-10 minutes.
-
Apply
Scrape the trowel around the barrel, move it slowly, and stop the grout from dispersing. Apply the grout to fill the joints.
-
Remove Excess Grout
Use a dry sponge to remove the excess grout. Make sure that moisture is not added in this stage.
-
Sponge the surface
To reveal the tile surface, use a moist sponge. You can make diagonal movements for best results.
-
Fine-clean tiles
Use a dry sponge with water to retain lubrication. Take care of the grout applied on the tiles.
-
De-haze
Leave the grout for an hour or till it fully cures. De-haze the tiles using a microfiber cloth. If it doesn’t work, use a grout stain remover.
-
Let it dry
Different grouts take their respective time to cure. Read the label and use accordingly.
Conclusion
The stages of grouting are a comprehensive process that requires careful attention to detail. From surface preparation to final inspection, each stage contributes to the overall success of the tile, stone, or masonry installation. Proper grouting enhances the aesthetic appeal of the project and plays a vital role in improving the structural integrity.
If you want to know more about grouting and its application, contact experts from Lakhwa Chemical Services, one of the best companies in Karachi, Pakistan.

")
Leave a Reply
Want to join the discussion?Feel free to contribute!